HOW IS A BICYCLE TIRE FITTED?
- An appropriate rim tape must completely and securely cover all spoke holes (fig. 1).
- Observe any rotation direction markings on the tire sidewall. Fit one side of the tire onto the rim.
- Slightly inflate the tube until it is round. Fit the valve through the valve hole in the rim.
- Place the tube into the tire (fig. 2).
- Never use sharp fitting tools (fig. 3).
- Starting opposite the valve, mount the other tire side onto the rim. Ensure the tube is not pinched between the rim and the tire (fig. 4).
- The valve should be in an upright position (fig. 5).
- Center the tire before inflating it to the required pressure.
- Adjust the inflation pressure using a pressure gauge, e.g. the Schwalbe Airmax Pro. The permitted inflation pressure range is marked on the tire sidewall. Check the tire pressure at least once per month with an air gauge (fig. 6).
WHY IS IT SOMETIMES SO DIFFICULT TO FIT A TIRE?
Fitting difficulties often arise when the diameters of the rim and the tire do not match perfectly.
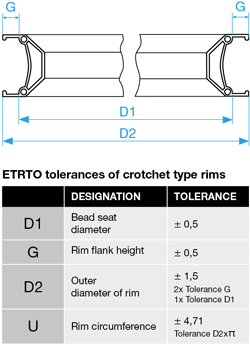
Rims may have a tolerance in diameter of +/- 0.5 mm (D1). In addition, the height of the rim flank also may have a tolerance of +/- 0.5 mm (G). This adds up to a complete tolerance of +/- 1.5 mm in the outer diameter (D2), or of +/- 4.7 mm in the outer circumference. This corresponds to a maximum possible circumferential difference of 9.4 mm between the largest and the smallest rim.
A tire must fit on both extremes. Because a safe fit must be ensured even on the smallest permissible rim diameter, the fitting and the proper centering of the tire on the largest permissible rim can prove quite difficult.
The circumferential tolerance of Schwalbe tires is ± 1 mm.
WHAT CAN BE DONE, IF IT IS DIFFICULT TO FIT THE TIRE ON THE RIM?
It is always helpful to start the fitting opposite the valve and to finish it at the valve, as the tire bead to be mounted should lie in the rim well as far as possible.
Instead of pushing the tire with the thumb, it is often easier to roll the tire bead over the rim flange from the opposite side on.
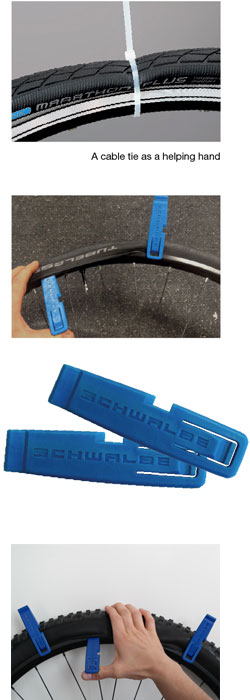
Using tire levers helps a lot. Make sure the tire bead is not damaged during the fitting. Lever the tire in small sections and use the tire levers more often. Do not use metal tire levers.
Sometimes the fitting of the narrow versions of the Marathon Plus tire turns out to be particularly difficult. Due to the inherent stress of the tire, the tire slips repeatedly from the drop-center and it is extremely hard to pull the last piece of the tire over the rim flange. A helping hand holding the tire on the opposite side in the dropcenter is very helpful. A cable tie or an old pedal strap could also serve as a helping hand.
The new Schwalbe tire lever is particularly helpful when fitting is difficult. You can hook it in on the rim and herewith fix the already mounted area of the tire bead. This will prevent the bead from slipping out while you lever the last section over the rim flange.
WHAT CAN BE DONE, IF THE TIRE CANNOT BE CENTERED?
When the rim diameter is at maximum tolerance and the tire diameter is at minimum, it is difficult to get the tire beads onto the rim bead seat.
Solution: Slightly over-inflate the tire for a short time, or put soapy water onto the tire beads to make them slip into place more easily.
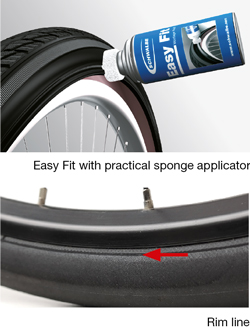
Our assembly fluid, Easy Fit, can be easily applied to the tire by use of the sponge applicator and without using extra tools or dirtying fingers. When inflating, the tire bead then glides easily into the right position on the rim. After approx. 10 minutes the liquid evaporates completely.
When the rim diameter is at minimum and the tire diameter at maximum, the tire cannot be seated properly regardless of the tire pressure. This situation can generally be addressed by centering the tire by hand at low inflation pressure. Move the tire with your thumb until the rim line is parallel to the rim all around the tire. Finish by inflating the tire fully.
Make sure it is parallel to the rim. Only then should you pump the tires up fully.
WHAT SHOULD BE OBSERVED FOR THE FITTING ON HOOKLESS RIMS?
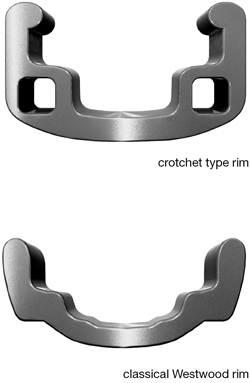
A "hooked rim" is the normal case nowadays - i.e. a rim where the rim flanges end inwards at the top with a hook. However, there are also many so-called "Westwood" rims on the market. Dutch bikes, for example, are often on it. These classic rims have no hook to hold and center the tire. In addition, Westwood rims are made of steel with a very smooth surface. These rims require special attention during installation.
Manual centering. Before the tire is inflated tightly, it is necessary to ensure that it is centered on the rim. Unlike a hook rim, the tire does not automatically slide into place when inflated. If the tire sits unevenly, it can easily pop off the rim.
Air pressure max. 4 bar. Generally, such rims are not suitable for high pressure. The maximum possible air pressure of the tire can usually not be exhausted on such rims. The ETRTO standard limits the air pressure to 5 bar. We recommend that you allow for a little more safety reserve and leave it at four bars. This also means that these rims are not well suited for narrow tires or heavy riders.
Meanwhile, there are also modern MTB carbon rims without hooks on the market. According to our experience so far, however, tire mounting on them works without any problems. Through appropriate flank heights and material surfaces (friction) is a sufficient jump-off security.
HOW IS A TUBULAR TIRE FITTED?
Attention: Tubular tires should be professionally fixed to rims using a proprietary contact cement (e.g. Schwalbe Tubular Glue)!
Preparation 1:
As a test, first fit the tire without contact cement (2, 8-10). Check the valve lengtah, using an extender if necessary. Recommendation: Fitting the tire on the rim beforehand using light pressure facilitates later permanent fixing.
Preparation 2:
RTire: Slightly inflate the tire until it has a round shape (2). Evenly coat the base tape with a layer of contact cement (3) and let it dry for at least 6 hours (5).
New rim: Remove grease and if necessary roughen the rim well with fine sandpaper (1). Follow the rim manufacturer’s instructions! Evenly apply a layer of contact cement to the Rim (4) and let it dry for at least 6 hours (5)!
Used rim: Examine the existing contact cement layer. An even and intact contact cement layer can be re-used. If the layer is very uneven, completely remove all remnants of the contact cement from the rim and apply new cement (4). Let it dry for at least 6 hours (5)!
Fitting:
Apply a fresh layer of contact cement to the tire and rim (6/7). Immediately put on the tire: insert the valve. Valve at top position. Pull the tire as firmly as possible, so that the final section of tire slips over the edge of the rim in an easy and controlled manner (8-9). Centre tire position. The edge of the base tape serves as orientation (10). Inflate to approx. 9 bar/130 psi (11) and push down on the whole of the tire’s circumference using your full bodyweight. Clean off any remnants of contact cement from the rim sidewall.
Important: Leave the assembly to rest under pressure for at least 24 hours (12)! Check tires regularly. Never ride on tires with a damaged or loose base tape.

